


The direction that the grass is bent determines the light- or dark-colored stripe. When the blades of grass are bent away from you….the grass appears lighter in color because the light is reflecting off of the wide, lengthy part of the blade. When the blades of grass are bent towards you, the grass appears darker as you are looking more of the tips of the blades (a smaller reflective surface) and the shadows under the grass. So cutting a lawn in an opposing pattern (up/down, right/left, north/south, east/west, etc.) provides the most contrasting stripe effect. Interestingly, as the “color” of the stripe is dependent upon what direction you are looking at it from, a light-colored stripe will appear dark if you view it from the opposing direction.

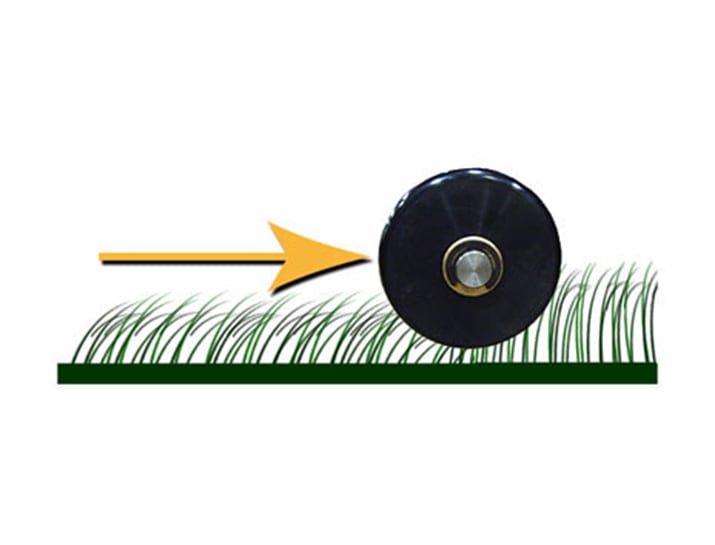
The easiest way to intensify the stripe is to bend the grass farther. The best way to do that is to physically contact it with a roller and press it to the ground. The Scag® Tiger Striper does exactly that. In fact, it even uses spring force to bend the grass over. It is much more effective than other systems that simply glide a roller across the tips of the grass. Stripe intensity can also be affected by the length of cut. Cutting the grass shorter will normally lessen the stripe as the shorter grass blade will not bend over as far and therefore reflects less light. A longer cut will normally enhance the striping pattern. Even a small amount can make a noticeable difference. Going from 2″ to 2 1/2″ or from 3″ to 3 1/2″ can make a difference in the intensity of the lawn-stripe pattern.
Grass types are also a factor in striping. Certain breeds of grass will bend easier and can provide a better stripe pattern. Warm-season grasses (found in the southern regions of the United States) are typically more difficult to stripe as they are more rigid and harder to bend.
The stripe is also affected by the position of the sun. Stripe patterns may seem more intense at various times of the day and at different light levels. When the sun is behind you, you will see a more intense stripe pattern.

Begin by mowing the perimeter around the property (reference the diagram to the right). Next, mow in opposing directions through the remaining property.
Take care when turning at the end of each row to prevent turf damage. A simple “Y” type turn at the end of each row will reduce the chance of turf damage while setting the mower up for the next row to be mowed.
Going over the perimeter once again will remove any stripe-pattern irregularities left from turning at the end of each row and deliver a clean, finished look.

Begin by mowing the perimeter around the property (reference the diagram to the right). Next, mow in opposing directions through the remaining portion of the property (as shown in the diagram to the left). Take care when turning at the end of each row to prevent turf damage. A simple “Y” type turn at the end of each row will reduce the chance of turf damage while setting the mower up for the next row to be mowed. Now, travel perpendicular to the direction of the original mowing pattern. (For example, if you were mowing north and south, now mow east and west.) Finish the job by mowing the perimeter again. Going over the perimeter once again will remove any stripe-pattern irregularities left from turning at the end of each row and deliver a clean, finished look.

This pattern is achieved using the same technique as the “Checkerboard” stripe pattern listed above. Simply apply the stripes in a diagonal direction.

Start by completing the diagonal or checkerboard pattern listed above. This serves as a template for the zigzag pattern and is very helpful when first applying this unique stripe pattern.
Select a “light” stripe towards the center of the checkerboard area. Travel across one of the intersecting “dark” stripes and onto the next “light” stripe. Carefully turn the mower, while on the “light” stripe, 90 degrees to the right. Move forward across the next “dark” stripe and onto the “light” stripe, and carefully turn the mower 90 degrees to the left. Keep repeating this as you move across the area. When you reach the end of the area you are striping, repeat this procedure on the light-colored stripe next to the zigzag path you just mowed. Repeat.
Finish the job by mowing the perimeter again. Going over the perimeter once again will remove any stripe-pattern irregularities left from turning at the end of each row and deliver a clean, finished look.

When mowing/striping around trees and other obstacles, mow around the object into the uncut path (reference the picture to the left). While making your next pass, you will mow/stripe over the turn marks and retain your nice, even stripe pattern. With a little practice, your stripes will appear to pass directly through the objects, producing an even stripe throughout your lawn.

Lawn striping can be easy with the right tools and a little planning. A stripe pattern can make fertilizing and overseeding easier by giving you definitive lines to follow. It can also help detract attention from imperfections in your lawn such as weeds or bare spots. Striping is sometimes used to accentuate certain parts of a property. By converging the stripe pattern at a particular location (a focal point like a fountain, flowerbed, etc.), you can draw the viewer’s attention to that area.
Lawn striping is an excellent way to set your lawns apart from the competition and create a lawn that everyone admires. If you are serious about striping, it is important to know that all lawn stripers are not created equal.

Begin by mowing the perimeter around the property. Next, mow in opposing directions through the remaining property. Take care when turning at the end of each row to prevent turf damage.

Begin by mowing the perimeter around the property. Next, mow in opposing directions through the remaining portion of the property. Take care when turning at the end of each row to prevent turf damage.

Start by completing the DIAGONAL or CHECKERBOARD pattern listed above. Select a “light” stripe towards the center of the checkerboard area. Travel across one of the intersecting “dark” stripes and onto the next “light stripe. Carefully turn the mower, while on the “light” stripe 90 degrees to the right. Move forward, across the next “dark” stripe, onto the “light” stripe and carefully turn the mower 90 degrees to the left. Keep repeating this as you move across the area. Repeat.